使用Vue搭建单页应用简化了前端开发了复杂度,开发人员以关注数据为主避免了直接的DOM操作,Vue提供的组件(类似的技术HTML5 Custom Elements现在浏览器的支持还很有限)可以很好的进行业务封装。使用基于Webpack的Vue脚手架开发应用,开发时是的ES6语法打包会转为ES5(大部分浏览器已经支持)的js代码。这里介绍下项目开发环境和提供的功能包括以下部分:
- 安装环境
- 依赖管理
- 开发环境数据对接
- 饿了么组件
- RESTful操作
- PDF预览支持
- 多页面支持
- 全局Bus插件
- WebSocket支持
- 桌面通知支持
- 元素已读
- 提供唯一标识支持
- 默认图片指令
- 优化打包文件大小
安装环境
首先安装Node.js环境,再安装vue-cli用于配置脚手架,具体命令如下:
$ npm install -g vue-cli
$ vue init webpack my-project
在安装过程需要进行Vue允许环境的选择Runtime + Compiler和Runtime-only,第一个比较大因为要支持字符串模版,如果你的项目中只使用渲染函数作为模版则可以选择后面一个。接下来配置代码检查工具ESLint在多个协作开发的时候统一代码风格是必须的这里选择了Standard。再来的单元测试也需要配置下建议使用Jest(早期的版本只有Karma)。最后添加端到端的测试Nightwatch(可以粗略的理解为集成测试,早期版本使用的是PhantomJS集成的WebKit版本偏低可能不适用于使用了浏览器新特性的项目)
依赖管理
使用npm进行依赖管理,由于国内访问npm有点慢所以最好加上国内镜像这里选择淘宝提供的镜像。添加方式有两种:在安装时显示添加镜像配置npm install --registry=https://registry.npm.taobao.org或者直接修改默认的地址npm config set registry https://registry.npm.taobao.or
$ cd my-project
$ npm install --registry=https://registry.npm.taobao.org
$ npm run dev
开发环境数据对接
由于本项目的请求是需要携带用户信息的,脚手架默认提供的代理修改配置后需要重启才生效麻烦了点。这里进行改造通过后端提供的OAuth 2直接在浏览器上完成用户的切换(对于要测试不同用户的不同数据时很简便了)
OAuth2服务端使用Spring Boot搭建,通过@EnableOAuth2Client和@EnableAuthorizationServer启用服务,启动后需要进行测试可以使用PostmanAPI测试工具提供的测试方法,具体可参考Spring Boot and OAuth2
<dependency>
    <groupId>org.springframework.boot</groupId>
    <artifactId>spring-boot-starter-security</artifactId>
</dependency>
<dependency>
    <groupId>org.springframework.security.oauth</groupId>
    <artifactId>spring-security-oauth2</artifactId>
</dependency>
<dependency><!-- 存储OAuth2数据 -->
    <groupId>org.springframework.boot</groupId>
    <artifactId>spring-boot-starter-data-redis</artifactId>
</dependency>
Node环境下使用simple-oauth2与服务端通信,在build/dev-server.js(新版本的脚手架中已不存在本类了,可以在build/webpack.dev.conf.js的devServer配置添加before方法参看DevServer)中添加。具体的流程是先通过OAuth2获取Access Token然后在代理中修改请求的路径附加上access_token这样每个请求就有用户标识了。
var sessionStore = new session.MemoryStore()
var sessionOptions = {
  resave: false,
  saveUninitialized: true,
  secret: 'keyboard cat',
  cookie: {},
  store: sessionStore
}
app.use(session(sessionOptions)) // 开启session支持

var useOauthInDev = process.env.OAUTH === 'true' // 通过环境变量控制是否开启OAuth2
if (useOauthInDev) {
  // 从session中获取OAuth2信息
  var getOauth2data = function (session) {
    var oauth2data = session ? session.oauth : null
    if (!oauth2data) {
      console.error('oauth2 data not found');
      return
    }
    if (!oauth2data.token) {
      console.error('oauth2 data token not found');
      return
    }
    return oauth2data
  }

  if (config.devo.proxyTable) {
    proxyTable = config.devo.proxyTable
  }
  Object.keys(proxyTable).forEach(function (context) {
    var options = proxyTable[context]
    options.onProxyReq = function (proxyReq, req, res) {
    var oauth2data = getOauth2data(req.session)
    if (oauth2data) {
        // 在代理地址上附上OAuth2的access_token
        proxyReq.path = proxyReq.path + (proxyReq.path.indexOf('?') > 0 ? '&' : '?') + 'access_token=' + oauth2data.token.access_token
        if (oauth2data.headers) {
        Object.keys(oauth2data.headers).forEach(k => {
            proxyReq.setHeader(k, oauth2data.headers[k])
        })
        }
      }
    }
  })

  // 初始化 OAuth2
  var oauth2 = require('simple-oauth2').create(config.devo.oauth);

  // 处理OAuth2服务器回调并请求access token,在代理请求中使用
  app.get('/oauth_callback', (req, res) => {
    var oauth2data = req.session.oauth
    var headers = req.query.headers
    if (headers) {
      try {
        oauth2data.headers = JSON.parse(headers)
      } catch (e) {
        console.log('set user header error', e)
      }
    }
    var code = req.query.code
    if (!code) {
      res.end()
      return
    }
    oauth2data.code = code;
    var tokenConfig = {
      code: code,
      redirect_uri: oauth2data.redirect_uri
    };

    // 获取access token
    oauth2.authorizationCode.getToken(tokenConfig, (error, result) => {
      if (error) {
        console.error('Access Token Error', error.message);
        return res.json('Authentication failed');
      }

      console.log('The resulting token: ', result);
      var token = oauth2.accessToken.create(result);
      oauth2data.token = token.token

      // 处理完成后返回原始页面
      res.redirect(req.session.originalUrl || '/')
    });
  });

  // 退出时顺带退出服务器上的用户
  app.get('/logout', (req, res) => {
    req.session.oauth = null;
    let host = config.devo.oauth.auth.tokenHost
    let url = host + '/logout?redirect=' + encodeURIComponent(req.query.redirect)
    res.redirect(url);
  });

  // 判断是否存在OAuth2授权信息,如果没有进行授权
  app.use((req, res, next) => {
    if (req.url !== '/__webpack_hmr' && req.url.indexOf('/dev/') !== 0
        && (req.url === '/' || /^.*?\/\w+$/.test(req.url))) {
      var oauth2data = req.session.oauth
      if (!oauth2data) {
        oauth2data = {}
        req.session.oauth = oauth2data
      }
      if (!oauth2data.code) {
        // 记录原始页面用户OAuth2处理完后跳转
        req.session.originalUrl = req.originalUrl
        // 拼接OAuth2回调地址
        oauth2data.redirect_uri = req.protocol + '://' + req.get('host') + '/oauth_callback'
        var authorizationUri = oauth2.authorizationCode.authorizeURL({
          redirect_uri: oauth2data.redirect_uri,
          scope: 'app',
          state: 'nodejsvue'
        });
        res.redirect(authorizationUri) // 无授权码时重定向到OAuth2服务器
        return
      }
    }

    next()
  })
}
饿了么组件
项目启动时使用的是饿了么的1.X版本。使用了自定义主题需要进行附加的配置,由于想避免污染全局命令就没有使用全局安装主题生成工具npm i element-theme -g而是采用安装到开发依赖中npm i element-theme -D,默认主题是使用npm i element-theme-default -D安装到开发依赖中。由于没有在全局安装element-theme因此需要向package.json文件中添加scripts配置"et": "et",这样可以使用npm run et -- -i代替官方的et -i初始化变量文件,为了规划好路径向package.json添加了配置:
{
  "element-theme": {
    "browsers": [
      "ie > 9",
      "last 2 versions"
    ],
    "out": "./src/assets/element/theme",
    "config": "./src/assets/element/element-variables.css",
    "minimize": false
  }
}
接着在src/main.js中引入Element
import Element from 'element-ui'
import '@/assets/element/theme/index.css'

// 引入“饿了么”界面组件
Vue.use(Element)
RESTful操作
使用axios来访问后端API,选择这个的原因是它支持Promise和可以在node.js环境下使用。但是考虑到后期可能存在切换为Fetch API时比较方便点,而且封装成RESTful将于后端提供的API保持一致的概念,还可以提供了统一的异常处理。提供get、post、del,patch方法。由于axios对location.search部分没有处理,因此再引入qs来处理:
qs.stringify({ a: { b: 'c' } }, { allowDots: true, indices: false })
PDF预览支持
PDF预览功能使用的是PDF.js,通过npm install pdfjs-dist -D添加依赖,由于PDF.js需要Web Workers API来处理内容,因此在build/webpack.prod.conf.js中添加worker-loader插件,这样可以按照统一的资源规划:
new webpack.LoaderOptionsPlugin({
  options: {
    worker: {
      output: {
        // https://github.com/webpack-contrib/worker-loader/pull/22
        filename: utils.assetsPath('js/[hash].worker.js')
      }
    }
  }
})
接着在代码中引入,参考Setup PDF.js in a website:
import 'pdfjs-dist/webpack' // 自动配置worker
import 'pdfjs-dist/web/pdf_viewer.css'
import { PDFJS } from 'pdfjs-dist/web/pdf_viewer'

let pdfViewer = new PDFJS.PDFViewer({})
多页面支持
脚手架默认提供的是单页应用支持,考虑到注册页面并不需要太多的组件如果都和在一个页面中的话会延长显示的时间,因此考虑提供多页面支持这样打包后的js文件会小很多加载速度也更快。要添加多页面的功能需要开发环境和正式环境的支持。
开发环境
开发环境下要保证当通过浏览器刷新页面时返回的HTML时满足要求的数据,这里是通过URL路径前缀来区别不同的页面请求的(如:/aaa/bbb ---> aaa.html、/bbb/abc ---> bbb.html),因此需要的修改DevServer添加自定义的代码,其中DevServer内部使用Express作为服务器开发过程中主要利用了app.use中间件来完成相应的功能。
首先添加获取多页面信息的工具类,由于不止一个地方需要使用到这个方法所以将这个方法添加util.js中具体代码如下:
// 转换正则特殊字符
exports.regexEscape = function (s) {
  return s.replace(/[-\/\\^$*+?.()|[\]{}]/g, '\\$&')
}

// 获取目录中的文件路径
exports.getFiles = function (dir, regex, files_) {
  files_ = files_ || []
  if (!fs.existsSync(dir)) {
    return files_
  }
  var files = fs.readdirSync(dir)
  for (var i in files) {
    var name = dir + '/' + files[i]
    if (fs.statSync(name).isDirectory()) {
      exports.getFiles(name, regex, files_)
    } else if (!regex || regex.test(name)) {
      files_.push(name)
    }
  }
  return files_
}

// 获取多页面实体
exports.getEntries = function (multiPageRoot) {
  if (!multiPageRoot) {
    return []
  }
  var root = path.resolve(__dirname, '../')
  var cut = 0
  if (multiPageRoot.indexOf(root) === 0) {
    cut = root.length
  }
  // 提供.html和.js的支持,.html文件对应与入口的index.html,.js对应于启动的main.js
  var fileList = exports.getFiles(multiPageRoot, new RegExp(`^${exports.regexEscape(multiPageRoot)}\/[^/]+\.(js|html)$`))
  var entries = fileList.filter(f => /\.js$/.test(f)).map(f => {
    var name = f.replace(/^.+?([^/]+)\.js$/, '$1')
    return {
      name,
      path: cut > 0 ? '.' + f.substring(cut) : f
    }
  })
  var tmps = fileList.filter(f => /\.html$/.test(f)).reduce((r, f) => {
    var name = f.replace(/^.+?([^/]+)\.html$/, '$1')
    r[name] = f
    return r
  }, {})
  entries.forEach(en => {
    en.filename = en.name + '.html',
    en.template = tmps[en.name] || 'index.html'
  })
  return entries
}
然后在build/dev-server.js(新版本的脚手架中已不存在本类了,可以在build/webpack.dev.conf.js的devServer配置添加before方法参看DevServer)中添加请求地址转换代码:
if (config.multiPageRoot) {
  var utils = require('./utils')
  // 获取多页面的信息
  var entries = utils.getEntries(config.multiPageRoot)
  if (entries.length > 0) {
    var paths = entries.reduce((r, en) => {
      r[en.name] = `/${en.filename}`
      return r
    }, {})
    var regex = /^\/(.+?)([\/\?].*)?$/
    app.use((req, res, next) => {
      var match = regex.exec(req.url) // 获取多页面前缀如: /xxx/yyy?aa=bb ---> xxx
      if (match && match[1]) {
        var url = paths[match[1]]
        if (url) {
          // 拼接出新的地址如:/xxx.html?aa=bb
          var idx = req.url.indexOf('?')
          req.url = idx > 0 ? url + req.url.substring(idx) : url
        }
      }
      next()
    })
  }
}
接着在开发环境配置webpack.dev.conf.js中添加HtmlWebpackPlugin插件用于生成html文件,代码如下:
var pages = ['app']
if (config.multiPageRoot) {
  var entries = utils.getEntries(config.multiPageRoot)
  pages.push(...entries.map(en => en.name))
  baseWebpackConfig.plugins = []
  entries.forEach(function (en) {
    var name = en.name
    baseWebpackConfig.entry[name] = en.path
    baseWebpackConfig.plugins.push(new HtmlWebpackPlugin({
      filename: en.filename,
      template: en.template,
      excludeChunks: pages.filter(p => p !== name),
      inject: true
    }))
  })
}
还得在默认的HtmlWebpackPlugin中添加配置excludeChunks: pages.filter(p => p !== 'app'),确保每个HTML文件只包含当前页面需要的js。
相应的还需要的在生产环境配置webpack.prod.conf.js中配置相应的信息,别忘了在默认的HtmlWebpackPlugin中添加excludeChunks: pageNames,,代码如下:
var pageEntries = []
var pageNames = []
if (config.multiPageRoot) {
  pageEntries = utils.getEntries(config.multiPageRoot)
  pageNames = pageEntries.map(en => en.name)
}

if (pageEntries.length > 0) {
  var pns = ['app', ...pageNames]
  pageEntries.forEach(function (en) {
    var name = en.name
    webpackConfig.entry[name] = en.path
    webpackConfig.plugins.push(new HtmlWebpackPlugin({
      filename: en.filename,
      template: en.template,
      inject: true,
      minify: {
        removeComments: true,
        collapseWhitespace: true,
        removeAttributeQuotes: true
        // more options:
        // https://github.com/kangax/html-minifier#options-quick-reference
      },
      excludeChunks: pns.filter(p => p !== name),
      // necessary to consistently work with multiple chunks via CommonsChunkPlugin
      chunksSortMode: 'dependency'
    }))
  })
}
最后在config/index.js中配置下module.exports.multiPageRoot所在的目录multiPageRoot: path.resolve(__dirname, '../src/pages'),这样就可以在指定目录下新建多页面文件(.html或者.js),这里没有需要对html内容做些修改因此自己复用了/index.html文件只需添加对的js文件,例如新建一个注册页面src/pages/register.js代码如下:
import 'es6-promise/auto'

import Vue from 'vue'
import App from '@/views/register/Index'

Vue.config.productionTip = false

/* eslint-disable no-new */
new Vue({
  el: '#app',
  render: h => h(App)
})
在执行命令npm run build后可以看到dist目录中多出了register.html文件,目录结构如下:
$ tree -L 2 dist
dist
├── index.html
├── register.html
└── static
    ├── css
    ├── img
    └── js
正式环境
如果后端使用的是nginx可以通过配置location来实现。
location /static/ {
    root html/vue;
    access_log off;
    autoindex_exact_size off;
    charset utf-8,gbk;
}

location /register { # 支持Vue Router的mode: 'history'
    root html/vue;
    try_files /register.html 404;
}

location / {
    root html/vue;
    try_files /index.html 404;
}
如果后端使用的是Spring的话,通过WebMvcConfigurerAdapter添加ResourceHandler来实现资源文件的请求支持。
/**
 * 设置处理静态资源
 *
 * Created by rjf on 17/7/1.
 */
public class StaticResourceConfiguration extends WebMvcConfigurerAdapter {

    @Autowired
    ObjectProvider<StaticResourceProperties> appPropertiesObjectProvider;
    @Autowired
    ObjectProvider<ResourceProperties> resourcePropertiesObjectProvider;

    @Override
    public void addViewControllers(ViewControllerRegistry registry) {
        StaticResourceProperties staticResourceProperties = appPropertiesObjectProvider.getIfAvailable();
        if (staticResourceProperties == null) {
            return;
        }
        Map<String, String> urlViewMapping = staticResourceProperties.getUrlViewMapping();
        if (!urlViewMapping.isEmpty()) { // 用于支持Vue Router的mode: 'history'
            for (Map.Entry<String, String> entry : urlViewMapping.entrySet()) {
                registry.addViewController(entry.getKey()).setViewName(entry.getValue());
            }
        }
    }

    @Override
    public void addResourceHandlers(ResourceHandlerRegistry registry) {
        StaticResourceProperties staticResourceProperties = appPropertiesObjectProvider.getIfAvailable();
        if (staticResourceProperties == null) {
            return;
        }
        ResourceProperties resourceProperties = resourcePropertiesObjectProvider.getIfAvailable();
        String[] staticLocations = resourceProperties == null ? new String[0] : resourceProperties.getStaticLocations();
        Map<String, String> staticPathPatterns = staticResourceProperties.getStaticPathPatterns();
        Map<String, String> staticPathCacheControl = staticResourceProperties.getStaticPathCacheControl();
        Map<String, String> staticPathCachePeriod = staticResourceProperties.getStaticPathCachePeriod();
        Pattern pattern = Pattern.compile("^\\w+:.+"); // 格式如:/static/**: static/
        for (Map.Entry<String, String> entry : staticPathPatterns.entrySet()) {
            ResourceHandlerRegistration registration = null;
            if (pattern.matcher(entry.getValue()).matches()) { // 存在自定义的静态资源路径
                registration = registry.addResourceHandler(entry.getKey()).addResourceLocations(entry.getValue());
            } else if (staticLocations.length > 0) { // spring.resources.staticLocations配置的静态资源路径
                String[] sls = new String[staticLocations.length];
                for (int i = 0; i < staticLocations.length; i++) {
                    String path = staticLocations[i];
                    if (!path.endsWith("/")) {
                        path =  path + "/";
                    }
                    sls[i] = path + (entry.getValue().startsWith("/") ? entry.getValue().substring(1) : entry.getValue());
                }
                registration = registry.addResourceHandler(entry.getKey()).addResourceLocations(sls);
            }
            if (registration != null) { // 设置静态资源的缓存策略
                String cacheControlStr = staticPathCacheControl.get(entry.getKey());
                if (cacheControlStr != null && !(cacheControlStr = cacheControlStr.trim()).isEmpty()) {
                    registration.setCacheControl(new RawCacheControl(cacheControlStr));
                }
                String cachePeriodStr = staticPathCachePeriod.get(entry.getKey());
                if (cachePeriodStr != null && !(cachePeriodStr = cachePeriodStr.trim()).isEmpty()
                        && cachePeriodStr.matches("^\\d+$")) {
                    registration.setCachePeriod(Integer.parseInt(cachePeriodStr));
                }
            }
        }
    }

    @Bean
    public StaticResourcPathControllerAdvice pathControllerAdvice() {
        StaticResourceProperties properties = appPropertiesObjectProvider.getIfAvailable();
        return properties == null
                ? new StaticResourcPathControllerAdvice(false, null)
                : new StaticResourcPathControllerAdvice(properties.isNotFoundToIndex(), properties.getIndexPath());
    }

    private static class RawCacheControl extends CacheControl {
        ...
    }

}

/**
 * 配置信息
 *
 * Created by rjf on 17/7/1.
 */
public class StaticResourceProperties {

    private String title;
    private boolean notFoundToIndex;
    private String indexPath = "/index.html";
    private Map<String, String> staticPathPatterns = new HashMap<>();
    private Map<String, String> staticPathCachePeriod = new HashMap<>();
    private Map<String, String> staticPathCacheControl = new HashMap<>();
    private Map<String, String> urlViewMapping = new HashMap<>();

    // getter and setter
}

/**
 * 处理异常
 *
 * Created by rjf on 17/6/30.
 */
@ControllerAdvice
public class StaticResourcPathControllerAdvice {

    private String indexPath;
    private boolean notFoundToIndex;

    public StaticResourcPathControllerAdvice(boolean notFoundToIndex, String indexPath) {
        this.notFoundToIndex = notFoundToIndex;
        this.indexPath = indexPath;
    }

    @ExceptionHandler({
            NoHandlerFoundException.class,
            NoSuchRequestHandlingMethodException.class
    })
    public void notFoundPath(Throwable ex, HttpServletRequest request, HttpServletResponse response) throws IOException, ServletException {
        if (notFoundToIndex) {
            request.getRequestDispatcher(indexPath).forward(request, response);
        } else {
            response.sendError(HttpStatus.NOT_FOUND.value());
        }
    }

}
然后就可以在配置文件中添加静态资源的信息:
demo:
  notFoundToIndex: true
  indexPath: /index.html
  staticPathPatterns:
    /static/**: static/
    /index.html: /
    /register.html: /
  urlViewMapping:
    /register/**: /register.html
  staticPathCacheControl:
    /index.html: max-age=3600, no-transform, public
  staticPathCachePeriod:
    /index.html: 0
全局Bus插件
提供Bus是为了减少组件间不必要的耦合,虽然可以直接在Vue实例的原型中设置Vue.prototype.$bus = new Vue()但是考虑到使用这种方式事件需要自己手动移除这样会加大内存泄漏的风险,因此才封装了全局Bus插件在Vue生命周期的销毁之前阶段进行事件的移除,具体代码如下:
// 全局Bus插件
export default {
  install (Vue, options) {
    function Bus () {
      this.cbs = []
    }
    Object.assign(Bus.prototype, {
      _origin_bus: new Vue(),
      $emit (event, ...args) {
        this._origin_bus.$emit(event, ...args)
      },
      $on (event, callback) {
        this._origin_bus.$on(event, callback)
        this.cbs.push([event, callback])
      },
      $once (event, callback) {
        this._origin_bus.$once(event, callback)
        this.cbs.push([event, callback])
      },
      $off (...args) {
        // 参考api的事件移除策略 https://cn.vuejs.org/v2/api/#vm-off-event-callback
        if (args.length > 0) {
          this._origin_bus.$off(...args)
          let [event, fn] = args
          let es = Array.isArray(event) ? event.map(e => [e, fn]) : args
          for (let x = 0, l = es.length; x < l; x++) {
            let ecb = es[x]
            let cb
            let i = this.cbs.length
            while (i--) {
              cb = this.cbs[i]
              if (cb[1] === ecb[1] || cb[0] === ecb[0]) {
                this.cbs.splice(i, 1)
                break
              }
            }
          }
        } else {
          for (let i = 0, l = this.cbs.length; i < l; i++) {
            this._origin_bus.$off(...this.cbs[i])
          }
          this.cbs = []
        }
      }
    })

    // 向原型中添加$bus属性
    Object.defineProperty(Vue.prototype, '$bus', {
      get () {
        if (!this._bus) {
          this._bus = new Bus()
        }
        return this._bus
      }
    })

    // 混入清理事件
    Vue.mixin({
      beforeDestroy () {
        if (this._bus) {
          this._bus.$off()
        }
      }
    })
  }
}
WebSocket支持
为了方便的往浏览器推送信息在项目中添加WebSocket,而且通过Can I use查询到IE 10以上都支持。结合之前的全局Busthis.$bus.$emit(msg.type, msg.data, 'websocket')后业务组件就可以实现服务器数据推送引发组件显示效果变化的能力。考虑到存在网络变化的存在需要进行WebSocket的重连,这个功能是通过W3C的Online and offline eventsAPI实现。当太久时间没有向后台发起请求会导致Session过期,因此需要在WebSocket中添加心跳this.socket.send('heartbeat')维持Session。详细代码如下:
export default {
  data () {
    return {
      socket: null,
      datas: []
    }
  },
  created () {
    this.initWebSocket()
    this.$bus.$on('websocket:send', (userId, msg) => {
      this.sendWsMsg(userId, msg)
    })
    window.addEventListener('online', this.reinitWebSocketOnOnline)
  },
  destroyed () {
    window.removeEventListener('online', this.reinitWebSocketOnOnline)
  },
  methods: {
    recevieWsMsg (msg) {
      // 转发数据到Bus中
      this.$bus.$emit(msg.type, msg.data, 'websocket')
    },
    sendWsMsg (userId, msg) {
      let data = JSON.stringify({
        type: 'msg',
        data: {
          toUser: userId,
          content: msg
        }
      })
      if (this.socket && this.socket.readyState === WebSocket.OPEN) {
        this.socket.send(data)
      } else {
        this.datas.push(data)
        this.reinitWebSocketOnOnline()
      }
    },
    reinitWebSocketOnOnline () {
      if (!this.socket || this.socket.readyState !== WebSocket.OPEN) {
        console.log('reinit WebSocket on online event')
        this.initWebSocket()
      }
    },
    initWebSocket () {
      if (this.socket) {
        this.socket.close()
        this.socket = null
      }
      this.socket = new WebSocket(`ws://${location.host}/ws`)
      this.socket.addEventListener('open', (event) => {
        let il = setInterval(() => {
          if (this.socket && this.socket.readyState === WebSocket.OPEN) {
            this.socket.send('heartbeat') // 发送心跳
          } else {
            clearInterval(il)
          }
        }, 1 * 60 * 1000)
        for (const data of this.datas) {
          this.socket.send(data)
        }
        this.datas = []
      })
      this.socket.addEventListener('message', (event) => {
        try {
          this.recevieWsMsg(JSON.parse(event.data))
        } catch (e) {
          console.error('websocket message json error', e)
        }
      })
      this.socket.addEventListener('close', (event) => {
        this.socket = null
      })
      this.socket.addEventListener('error', (event) => {
        if (window.navigator.onLine) {
          setTimeout(() => { // 开启重连
            console.log('try to reinit WebSocket on error')
            this.initWebSocket()
          }, 1 * 60 * 1000)
        }
      })
    }
  }
}
桌面通知支持
由于Web应用存在一个问题当从应用所在的Tab切换到其他Tab或者浏览器不活跃时通知等信息将不被用户感知,因此需要桌面通知进行提醒。这里使用了Web NotificationsAPI来完成通知的功能,其中还需要处理应用处于活跃时不进行桌面通知的发送这个利用了Document.hiddenAPI(不完美的方案,当浏览器处于不活跃且未被最小化时无效,以后可以结合W3C的其他API进行改进)。关键代码如下:
function sendBrowserNotify (msg, userName, userImg) {
  let n = new Notification(msg.fromUser ? userName : '系统', {
    icon: msg.fromUser ? userImg : null,
    body: '你有新消息',
    tag: 'notify'
  })
  n.onshow = function () { // 通知显示5秒后关闭
    setTimeout(n.close.bind(n), 5000)
  }
  n.onclick = () => { // 点击通知跳转的浏览器中
    window.focus()
    this.goTo(msg)
  }
}

if (this.documentHidden) { // 页面是否隐藏
  if (window.Notification && Notification.permission === 'granted') {
    sendBrowserNotify(msg, userName, userImg)
  } else if (window.Notification && Notification.permission !== 'denied') {
    getNotificationPermission(status => {
      if (status === 'granted') {
        sendBrowserNotify(msg, userName, userImg)
      }
    })
  }
  // 发送浏览器通知后,不再需要显示本地的通知
  return
}
元素已读
对于动态类信息经常需要有已读的功能来确认信息是否被看过,通常的是否在信息体被点击后主动发起请求。但是这种方式不适合于简单的列表数据,因此这里通过判断HTML元素是否在可视区内来表示本条信息是否被阅读过(对于已读表示不严格的业务可以使用)。本功能利用Element.getBoundingClientRect()API获取位置信息跟容器位置进行比较从而确定指定元素是否在可视区域内,当触发DOMContentLoaded,load,resize,scroll事件时进行判断,由于事件的触发可能会非常频繁但是判断逻辑可以适当延迟,这时可以配置节流函数(可以参考requestAnimationFrame + customEvent和throttle-debounce)。
// 判断元素 el 是否在容器元素 container 中,支持是否部分 partInView 在容器中
export function isElementInContainerView (el, container, partInView, rect) {
  let vheight = container.clientHeight
  let vwidth = container.clientWidth
  let crect = container.clientRect || container.getBoundingClientRect()
  rect = rect || el.getBoundingClientRect()
  let nr = {}
  nr.top = Math.floor(rect.top - crect.top)
  nr.left = Math.floor(rect.left - crect.left)
  nr.bottom = Math.floor(rect.bottom - crect.top)
  nr.right = Math.floor(rect.right - crect.left)
  nr.width = Math.floor(rect.width)
  nr.height = Math.floor(rect.height)
  return isElementInViewport(null, partInView, nr, vheight, vwidth)
}

// 判断元素是否在可视区内 代码参考 https://stackoverflow.com/a/7557433/5628
export function isElementInViewport (el, partInView, rect, vheight, vwidth) {
  rect = rect || el.getBoundingClientRect()
  vheight = vheight || window.innerHeight || document.documentElement.clientHeight
  vwidth = vwidth || window.innerWidth || document.documentElement.clientWidth
  if (partInView) {
    return (rect.bottom >= 0 && rect.right >= 0 &&
      rect.top <= vheight && rect.left <= vwidth)
  }
  return (rect.top >= 0 && rect.left >= 0 &&
      rect.bottom <= vheight &&
      rect.right <= vwidth
  ) ||
    (rect.top <= 0 && rect.height > vheight && rect.top + rect.height > vheight) ||
    (rect.left <= 0 && rect.width > vwidth && rect.left + rect.width > vwidth)
}

// 提供一个便捷的方法,当元素 el 可视状态发生变化时调用 callback
export function onVisibilityChange (el, callback) {
  var oldVisible
  return function () {
    var visible = isElementInViewport(el)
    if (visible !== oldVisible) {
      if (typeof callback === 'function') {
        callback(visible, oldVisible)
      }
      oldVisible = visible
    }
  }
}
提供唯一标识支持
当需要判断Vue组件实例是否一样时,可以给每个实例添加一个ID标识,虽然Vue内部存在_uid但是官方表示_uid是内部使用的属性不建议在应用中使用,因此本项目使用插件创建$_uid来使用。具体代码如下:
export default {
  install (Vue, options) {
    let uid = 0
    Vue.mixin({
      beforeCreate () {
        // 添加组件唯一标识
        this.$_uid = uid.toString()
        uid += 1
      }
    })
  }
}
默认图片指令
项目中存在很多标签经常出现图片地址错误或者图片丢失了导致页面上显示出错,现在通过捕获元素的error事件然后将地址替换为预先定义好的默认图片地址或者错误图片地址,利用Vue的自定义指令可以很方便进行配置。指令代码如下:
export const errorImg = {
  bind (el, binding, vnode, oldVnode) {
    let ei = el['@@errorImg'] = {
      type: 'error',
      getSrc () {
        let src
        if (binding.arg === 'user') {
          src = require('../assets/img/user.png')
        } else if (binding.arg === 'group') {
          src = require('../assets/img/group.jpg')
        } else if (binding.arg === 'video') {
          src = require('../assets/img/video.png')
        } else {
          src = require('../assets/img/def.png')
        }
        return src
      },
      listener () {
        let src = ei.getSrc()
        if (src) {
          el.imgUrl = el.src
          el.src = src
        }
      }
    }
    if (!el.src) {
      el.src = ei.getSrc()
    }
    el.addEventListener(ei.type, ei.listener)
  },
  update (el, binding, vnode, oldVnode) {
    if (!el.src) {
      let ei = el['@@errorImg']
      if (ei) {
        el.src = ei.getSrc()
      }
    }
  },
  unbind (el) {
    let ei = el['@@errorImg']
    if (ei) {
      el.removeEventListener(ei.type, ei.listener, false)
      delete el['@@errorImg']
    }
  }
}

// 注册自定义指令
Vue.directive('errorImg', errorImg)
注册好自定义指令后使用上很简单,例如<img :src="userImg" v-error-img:user>当userImg地址无法访问时就会替换为预先设置的assets/img/user.png
优化打包文件大小
默认情况下所有的js会打包的app.xxx.js中,如果没有进行优化配置的话(未进行Gzip压缩)可能大小是M单位的而普通的js这只有K大小,这样首次加载特别慢。为了解决这个问题可以先通过运行命令(使用到webpack-bundle-analyzer插件)npm run build --report查看各个依赖的大小(如下图)结合项目的功能缩减大小。
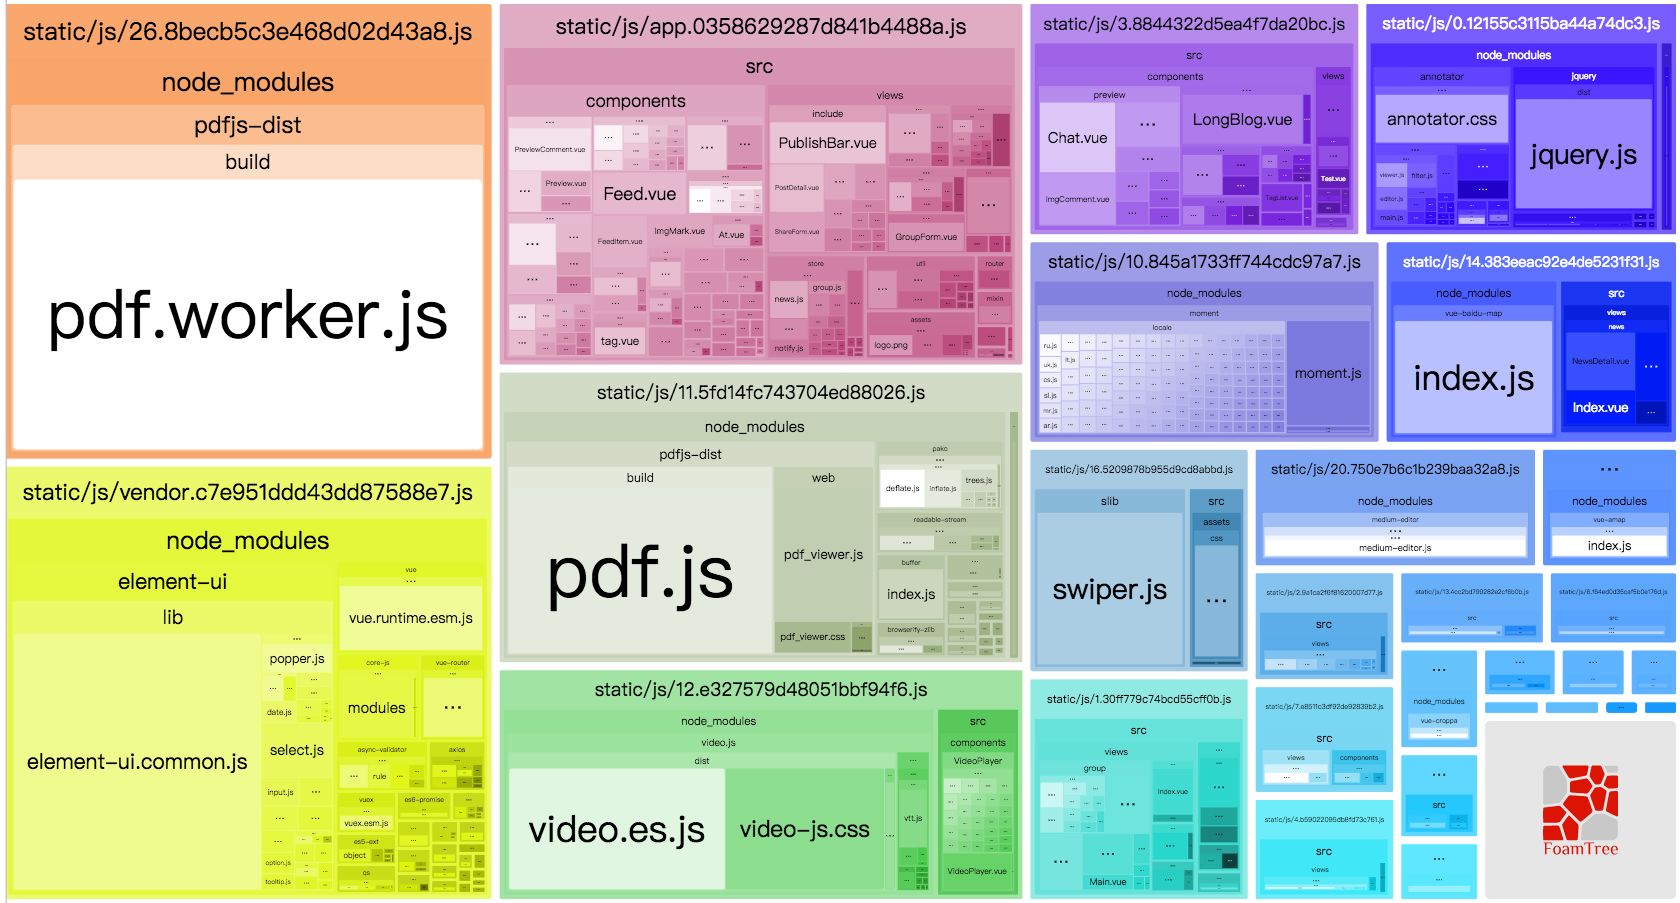
找到可以动态导入的依赖后使用Webpack提供的动态导入功能例如:const SwiperComponent = () => import(/* webpackChunkName: "swiper" */ './Swiper.vue')将生成多个js/[id].[chunkhash].js文件。再在webpack.prod.conf.js中添加插件new webpack.HashedModuleIdsPlugin()避免模块未变化时hash发生变化参考webpack缓存
